Make a Home. Raise a Family. Green your 'Hood.

Tuesday, November 15, 2011

Digging Potatoes

We are on the final stretch of warmish days and the beautiful weather lures me outdoors.  I should be getting out the winter clothes and ordering my daughter a snowsuit, but I'd rather enjoy these last few moments outdoors.
The forecast calls for some pretty frigid temperatures in the coming week so I decided that I'd bring in the last of the potatoes.  It's not just about harvesting, it's more of an assessment of my potato plan.  What worked and didn't?  More importantly, was it worth it? 
This past Spring, I planted my seed potatoes in containers.  My garden is a tiered one, to accommodate the slope in our yard.  Turning up potatoes would definitely undermine the stability of the retaining walls.
So I tried planting in containers.  Considering the fact that I planted them rather late in the Spring and that the area doesn't get a ton of sun, I'd say my plan was a moderate success.
I tried a couple of varieties in larger garbage cans.  The first can that I emptied didn't contain one potato, despite the fact that the vines grew just as vigorously as the others.  I wasn't sure if it was the variety ("Yukon Golds") or the can.  The soil in that container was markedly wetter than the others.  The other can that I planted contained a variety that did very well in the smaller container, but its performance in the garbage can was pretty disappointing.  I may try with the larger containers again next year, but I'll be sure to add more drainage holes.  I think the soil in the larger cans just got too wet and the majority of the potatoes planted in them rotted.
Harvesting the potatoes in the containers was a snap.  I dumped the wash bin into the wheelbarrow and fished out the potatoes.  They were ready to go to the basement to be cured!  The soil went into a pile by the compost bin to fill next year's containers.
It's a modest harvest, but encouraging.
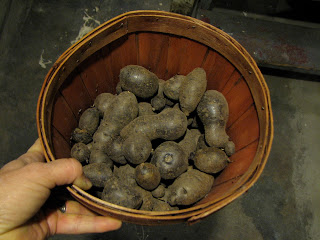
All considered, late planting, odd weather conditions, and dodgy seed (pictured above are the sport of that wacky bag of potatoes I found in the back of the pantry.  I NEVER expected much from that bin) I'd call the experiment a success.  I raised a sufficient amount of potatoes in a shady corner of the garden that can't handle much soil disruption.  The ones that we have eaten have been delicious and there are more stored away in the basement now.

Click here to read my earlier post on planting potatoes in containers.
Click here to learn about saving potatoes for planting next season.
Click here to learn about curing potatoes for storage.

Friday, November 11, 2011

From Decoration to Dessert: Transforming Pumpkin into Puree

It's getting pretty cold here at night, time to bring the pumpkins in off the porch and store them in the basement.
Someone will have to step up to the plate and be pie though.  And the honors go to...
Mr. Queensland Blue, with a blemish on his butt
the Queensland Blue that is showing a slight sign of rot on the bottom.
Once dispatched with a knife, emptied of it's pumpkiny innards, and quartered, I roast it at 350 degrees for about an hour.
Roasted to perfection!

Once roasted, I puree the flesh in a food processor.
I keep my pureed pumpkin in plastic refrigerator storage containers until needed.  Extra can be vacuum sealed and frozen for later use.
Fresh pumpkin (even FROZEN fresh pumpkin) is higher in nutrients than canned pumpkin from the store and it tastes so much better.  Extra pumpkin can be used in any recipe as added nutrition-- mashed potatoes, spaghetti sauce, gravy....  Sneak it in wherever you can to use it up.
Those extra cucurbits can hang out in the basement until they are needed.  Be sure to check them regularly for signs of rot.  I have kept Lumina pumpkins and Chersonskya squash through the winter and well into summer.  But now is the best time for them.  Roast them up and enjoy them!

Wednesday, November 9, 2011

Raking Leaves, Anyone’s Leaves


This time of year, I start looking for leaves.
I canvas the neighborhood and calculate.  Who needs their leaves raked the most?  Whose yard has the leaves I need the most?  How the heck am I going to get all my work done AND someone else’s leaves raked?
Leaves are a big part of my garden.  I use mowed leaves to build up my soil in the Fall.  I use oak leaves to increase the acidity in my soil for my azaleas, blueberries, and tamarack.  Now I plan to mulch my vegetables in the Summer with some leaves, so I have been bagging and saving mowed leaves for weed control next season.
The only problem is the fact that I have exactly one mature deciduous tree in my yard and it drops most of its leaves in the street.
So I mow the street.  I happily mow the leaves in my neighbor’s yard.  He’s the one that taught me to mulch with leaves and he isn’t as spry as he used to be.
My son mows lawns and one of his clients has five mature oaks in her yard.  She was MORE than happy to let me take some leaves off her hands to boost the acidity in my soil.
But I have found myself cruising slowly past leafy lawns, eyeing up my prospects.  There are a couple of lawns that could use some mutually beneficial raking.
And, hooray, I drove past a dozen plastic bags of leaves, waiting to go out for the weekly yard waste pick up.  My brother could use some of those for his soil building.
I have been known to cruise the neighborhood, looking for leaves.  I have taken the leaves of others.  I know I look like a crazy woman, but I can put those leaves to good use.  I am just really careful when I am emptying them.  I found a squirrel skull in one bag.
Lucky for me, there are no dogs living in the yard with all the bags.  I think I’ll be swinging by there once my son brings home the truck!

Tuesday, November 8, 2011

Tucking the Garden in for Winter, One Bed at a Time

It’s time to wrap things up in my garden.  As I harvest all the food from each bed, I begin to tuck it in for Winter.
I maintain my soil through crop rotation and amendments.  All summer long I mulch with grass clippings.  In the fall, I lay down even more mulch once the bed has been cleaned.  I try to disturb the soil as little as possible, cutting plants instead of pulling them out by their roots.  Some I leave in the beds to amend the soil, with the exception of the nightshades.  Nightshades, tomatoes, potatoes, and peppers, are prone to blight so I put those out for the compost collection.  I struggle with blight and I don’t want it to fester over Winter.  But bean plants are cleaned of their seed pods and stay where they grew to feed the soil.  I take the tops off carrots and leave them to compost where they were planted.  If it has a seed pod, I remove it and leave the rest on the bed.
Then I add another layer, usually mowed leaves (mowed leaves decompose more easily and don’t create a water proof mat in the Spring).  Next I add a layer of compost and aged manure if I can get it (no luck this year).  Everything is topdressed with a layer of oat straw and the bed is ready for Winter.
My lower bed got some extra attention this year.  Every year I concentrate the most effort into the beds that had the most taxing plants, this year the tomatoes and the peppers.  I layered sumac branches, chopped leaves, brussell sprout leaves, compost, and oat straw for an extra feeding.
The compost is getting down to the very bottom of the pile, so I economize where I can.  I only layer leaves and compost within the tomato cages in the tomato beds.  Those were heavily mulched with grass clippings all summer, so I don’t feel like I am skimping them too much.
Every year I worry that the compost will run out before I am finished.  This Fall, I decided to save a few plastic bags of mowed leaves for mulching next year so that I can put some of those grass clippings into the compost.  I bought heavy duty bags and stored the bagged leaves in a protected spot so they will be dry and ready for mulching next spring.  That way, I can make a little more compost with those grass clippings.
Now, I can really appreciate all those weeds that went into the compost pile all summer.  They’ll spend the Winter, feeding my soil, so that next year, I can feed my family.
Bottom bed, layered with brown and green (purple) material, compost, and oat straw.

Monday, November 7, 2011

Building a Garden From Scratch


One of my favorite gardening books is “Square Foot Garden” by Mel Bartholomew, but I like the older version better than the newer one.  My biggest complaint is the fact that Bartholomew sets such store in raised beds.  Not that I have anything against raised beds.  I think that they are great, provided one has easy access to good soil and LOTS of it.  Unfortunately, that’s rarely the case.
But then I wondered, couldn’t I build soil?  Okay, I know that I’ll not recreate the ice age or anything, but I can make compost and plants can grow in that.  It was worth a try.
So far the evil plan is working pretty nicely.  This past year I successfully grew a season’s worth of food on my made from scratch soil.
And as a dutiful big sister, I decided to try the same trick on my little brother.  I hope it turns out better than the time I convinced him that he could walk on hot coals barefooted.
So we built two beds in his backyard with posts and rabbit fencing.  He’ll fill them with his Fall leaves and lots of coffee grounds, a good basic recipe for compost.  Local coffee shops will save them for gardeners.  Add to that kitchen scraps and a bucket of compost from my own pile (like sourdough starter) and he should have the beginnings of some great soil.  Every year, he can continue to build the soil.  The rabbit fencing helps keep out his dog and any rabbit brave enough to enter the backyard while the dog is in it. The boards for those raised beds can come later.
Build them and fill them!  Fall is the perfect season.

Friday, November 4, 2011

Windfall, Twice in One Day

wind·fall noun \ˈwin(d)-ˌfȯl\
1: something (as a tree or fruit) blown down by the wind
2: an unexpected, unearned, or sudden gain or advantage

I was thinking of this word, with leaves swirling around my head, when I found I had carrots peeking out from under the dead bean plants.  I had planted them with the peas and promptly forgot them.  Harvesting them made the sad job of clearing out the dead beans a happier one.  I was so pleased with those pretty orange carrots that I took their picture.  I always forget to plant carrots.  It seems I never make room for them in my beds.  These were more of an afterthought, and now I was glad that I had planted them.  My beta carotene pallet was suddenly expanded.  If I can’t get Picky #1 to eat squash, maybe I’d have better luck with carrots.
Then Picky #1 called me, “Mom, I found a deer.  Can I keep it?”
“Say what?”
My oldest had found an injured deer on a path through the woods and called the sheriff.  The sheriff assessed the situation, a recently hit deer with a hopelessly broken leg.  He dispatched the deer (yes, he shot it) and filled out a tag for my son.  He found it, so he could keep it.
“Let me talk to that officer,” I said.
The officer told me that the deer would rot on the path until the county could come get it or we could take it home for ourselves.
The thought of eating roadkill didn’t even cross my mind.  I was just wondering where we’d put all that meat.  I had just bought 100 pounds of pastured beef and enough pastured chicken backs to make an entire season’s worth of chicken stock.
Thankfully, one of my son’s friends comes from a hunting family.  He went home and got his father, who was kind enough to field dress it for me.  He removed all of the deer’s innards, something I have never even witnessed.  Now the deer more closely resembled the ones I saw every Thanksgiving, hanging in the apple tree.  My son’s friends and I heaved that thing into the trunk of his Nissan Maxima.  Their reactions ranged from revulsion to fascination.  I can only wonder what they think of me now, standing there with blood on my Chuck Taylors, worrying about when I’ll find the time to butcher a deer while shoving roadkill into my son’s trunk.
We butchered it the next day and I processed meat for the better part of the week. 
I know it’s roadkill, but I’ll take free range, mostly organic meat any day of the week.  I grew up in a hunting family and I know the benefit of hunting deer to control the population.  Almost everyone I know has hit a deer some time in their life with minor to life taking consequences.
Just like my carrots, this dead deer was a windfall.  I didn’t do anything to deserve it or earn it.  We’ll eat it with the respect it’s due.  It was a beautiful animal who clearly went out at his prime and I was glad that my son found it and saw that he didn’t suffer any longer than necessary.   I was grateful that I could do something with it and happy that I had a family and friends to help.
I was also grateful that I lifted a copy of Outdoor Life from my dad’s house recently.  It had over a half dozen fancy ways to cook venison and at least a couple of them involved carrots.  Double windfall!

Sunday, October 30, 2011

Storing Potatoes for Winter


It’s not exactly Indian Summer here in Zone 4, but the garden is still pumping out Fall food and I have plenty of time to bring in the potatoes.
Mine are just fine in their bins.  They can stay there for quite a while, as long as the weather is mild.  Eventually though, I’ll dig them up to bring them in for winter.  I don’t want them to freeze and rot in those bins.
Potatoes should be cured before stored.  After digging, I lay them out on newspapers in the basement where it’s cool and dark.  They’ll stay there for about two weeks, until cured.  Damaged spuds (like the ones you hit with the shovel) don't need curing and should be eaten immediately.
Then I’ll store them in ventilated bins, (I use bushel baskets) covered with newspaper to protect them from light.  Ideally, I’d like to keep them at 35 to 40 degrees, but potatoes will keep for several months at 45 to 50 degrees.
Potatoes should not be washed before storage.  It’s impossible to get them dry enough to store them well.  I just gently wipe the big clumps off them after curing them.
My container potatoes did very well, so far.  The small reds were nice roasted.  The yellow Buttercreams were very small, but very good in Puerto Rican Chicken and Beans.  The purples were the prettiest and most abundant.  They were a deeper purple than a Crayola crayon and their flesh baked up a delicious, flaky lavender.  Even the boys thought they were cool.  They had two apiece.  I still have half a dozen containers to empty.  It feels like an early Christmas present.
My dad didn’t have such good luck with his potatoes, but, in his defense, he got the very end of my seed potatoes.  And we really planted them too late.  He took it pretty well.  He had enough for a good two meals and we’ll try again next year.
Don’t forget, Save the Faves!  Pick the cream of the crop and save them for seed potatoes for next year’s potatoes.  Keep them in a sturdy paper bag at the bottom of the fridge, marked SAVE! SEED POTATOES.

Saturday, October 29, 2011

Horseradish Beet Relish


Third time is hopefully the charm.
This is my third attempt at those Polish pickled beets from The Busy Bee in Chicago.  I keep upping the amount of horseradish to get that bite.
I made these with my dad last weekend and the horseradish in this batch really cleared our sinuses, but you never know.  We won’t know for sure if this recipe is it for another two weeks.
I’m posting it anyway.  I only have a few beets left in my garden and this is my last weekend to hit the farmer’s market.  Besides, I owe a Polish momma or two a stab at this recipe.
My dad will be here in a couple of weeks and we’ll open this most recent batch to give them a try.
In the meantime, pickle some beets of your own.
I found fresh horseradish at a larger co-op in the big city.  My dad got his at his local grocery store.

Horseradish Beet Relish

  • 8 c. medium grated beets, about 4 lb. fresh beets
  • 3 c. finely grated fresh horseradish root
  • 3 c. red wine vinegar
  • 1 c. sugar
  • 3 t. pickling salt
  • 2 T. pickling spices


  1. Cook beets until tender.  Cool and peel.
  2. Coarsely grate beets.
  3. Peel and finely grate horseradish root.
  4. Combine vinegar, sugar, salt, and pickling spice (tied in a cheesecloth bag) in a medium saucepan.  Boil for 15 minutes. 
  5. Add beets and horseradish.  Boil an additional 10 minutes.  Remove the spice bag.
  6. Pour beets and liquid into sterilized pint jars, leaving ½” headspace, and seal with 2 part lids.
  7. Process for 20 minutes in a water bath canner.  Store in a cool, dark space for three weeks.

Friday, October 28, 2011

Pumpkin Enchilada Sauce

I have a friend with three boys who is a wonderful cook.  When she told me that she had an enchilada sauce recipe that was made with pumpkin, I knew that I had to have it.  Anyone with a recipe that successfully gets pumpkin down the gullets of boys automatically has my undying respect and rock star homegirl status.
My oldest can spot a pumpkin cover up a mile away so I had to add a few ingredients to throw him off the trail.  I think I have it.

 Pumpkin Enchilada Sauce

  • 2 cups pumpkin puree
  • 2 roasted red peppers, I roasted mine last week
  • 4 cloves garlic, I roasted mine with the pumpkin
  • 1 jalapeno chili, I roasted mine the day before and removed the seeds.  This could be omitted or reduced to limit the spiciness of this dish.
  • 1 t. chili powder
  • 2 ½ c. water
  • 2 t. salt
  • 1 t. sugar
  • 1 t. cumin
  • ¼ t. pepper
  • 1/8 t. cinnamon

  1. In a food processor, puree the garlic, peppers, and garlic.
  2. Add the pumpkin puree and pulse to incorporate.
  3. Transfer to a saucepan and cook over medium heat for 30 minutes.
  4. Use in place of canned enchilada sauce, much tastier and MUCH healthier.


My son, ever dubious, asked, “Is there pumpkin in this?”
With a completely straight face, I answered, “No.”
I had used squash (“Sunshine”) instead.  Any bright orange squash or pumpkin would do, “Butternut” perhaps.  A Cinderella pumpkin (“Rouge Vif D’Etampes”) would be even better.  Its flesh is more red in color, but I'd have to answer yes to the pumpkin hater.
Everyone said it was much better than the canned stuff at the store.  My evil plan worked!
Thank you, Gretchen!

Thursday, October 27, 2011

Jalapeno Overload


Two Ways to Save Peppers:
At the end of the season I always have more peppers than my family would care to eat over the course of a week or two.  Peppers can be very expensive in the winter so I usually save that abundance for later.
One way to save peppers is to chop and freeze them.  I vacuum seal them in one cup servings for use in recipes later.  They soften in the freezer, so I add them to recipes near the end.  They may be softer than a fresh pepper, but they have all the taste of one.
Another way to save peppers is to roast and freeze them.  I did this with red peppers last week.  For full directions, see my October 21, 2011 post.
After cleaning out the garden, I realized that I had a grocery sack of jalapenos still in the garden.  I was at a loss as to what to do with them until I remembered a favorite recipe that calls for roasted jalapenos.  They roast up just as nicely as bell peppers.  The only difference in the process was that I donned food grade gloves for the job so as not to accidentally get jalapeno juice in any mucous membranes.
I vacuum sealed these individually to be used in recipes later.
With all these nice peppers, roasted and neatly packed away in the freezer, I’ll be looking for more recipes that call for them.  Let me know if you find a good one!

Wednesday, October 26, 2011

Winter Squash—Favorite Cucurbit


In the waning days of the farmer’s market, it’s all about the squash.
Some vendors carry them as decorations, some as dinner possibilities.  I plan to buy as many as I can and drag them all home this weekend.
My garden doesn’t reliably produce great squash.  I’m working on it, trying to find a sunnier spot or take advantage of some vertical possibilities.  Luckily, fellow homegirl extraordinaire, Peash, has offered up some of her garden space for more squash possibilities.  That thought will keep me going all winter.
In the meantime, how to get more squash into my family?
Winter squash is chock full of vitamins A, many Bs, C, niacin, folate, iron, and beta carotene.  Generally speaking, the deeper the color, the more beta carotene.
In need of a roasted chicken side dish, I tried roasting some “Sunshine” squash I picked up at the farmer’s market a few weeks ago.  My husband and I liked it as is, but the kids could have used a little encouragement to eat it.  “Not my favorite” is as negative as one is allowed to be at my dinner table.
Next time, I’ll try this recipe.  A little sugar and butter goes a long way with picky eaters.  I found it in our local co-op publication and it could work with any squash.
Maple Glazed Squash
For every 2-3 pounds squash,

  • 2 T. butter
  • 3 T. maple syrup
  • ¼ t. cinnamon
  • 1/8 t. garam masala (an Indian spice blend of cumin, coriander, black pepper, cloves, and cardamon)

  1. Cut squash in half and clean out seeds and pulp.  Divide the halves into single serving slices.
  2. Roast at 350 degrees for 30 minutes.
  3. Melt butter and add syrup and spices.
  4. Brush the insides of the squash with half the butter mixture and resume roasting.
  5. Bake an additional 20 minutes (or until tender, depending on density of squash variety).
  6. Remove from oven and brush with the remainder of the butter mixture.
  7. Serve.

Winter squash is plentiful at farmer’s markets in the late fall.  Many varieties will store all winter long in a cool, dry basement or closet.  Buy as many varieties as you can, ask about their attributes, and look for them in seed catalogs this winter to plan your own dream squash garden.

Monday, October 24, 2011

Walnut Basil Pesto


When it’s over, it’s over.  We can only cheat winter for so long.
I was hoping to dodge the frost bullet this past weekend.  I took a chance that my last basil plant would make it through the weekend, but it didn’t.
I had plans for a big pesto making session when I got back to town, but this past weekend’s cold snap changed those plans for me.
Maybe someone will have some armloads of cheap basil at the last farmer’s market of the season and I’ll still get a chance at making some.  If any of you in warmer climates still have basil in your plots, make some pesto and freeze it.  Before I had a vacuum sealer I’d put big scoops of it on cookie sheets and freeze it individually.  Then I put two dozen frozen glops of summertime into a freezer bag and enjoyed all winter long.  I use the vacuum sealer now and my freezer doesn’t smell like pesto.  A friend uses a jar of tomato puree and a quarter cup of frozen pesto to make a quick pasta sauce that is delicious.
And there is no sense in buying expensive pine nuts for pesto.  Walnuts are in season and work very nicely in pesto recipes.  One added bonus is the fact that walnuts are one of the healthiest nuts to be found.
Basil and Walnut Pesto
Ingredients:
For every 1 cup of packed fresh basil leaves,

  • 1 clove garlic
  • 1/8 c. chopped walnuts
  • 1/3 c. olive oil
  • ¼ c. Parmesan cheese
  • salt and pepper to taste

  1. Combine the basil, garlic, walnuts, and cheese in a food processor and pulse until coarsely chopped.
  2. Add the oil and process until all ingredients and finely chopped and fully incorporated.
  3. Add salt and pepper to taste.
  4. Freeze.

Friday, October 21, 2011

Roasted Red Peppers


With frost eminent, farmers will be emptying their gardens just as I am.  This past week, I bought a box of red pepper to roast and freeze.
My own pepper plants didn’t do so well this year.  It was a late Spring with a cool and wet June.  I got fruit, but it never ripened to red.
The following site has good instructions for roasting red peppers, but I don’t cover my bowl with plastic wrap to further steam the peppers.  Plastic wrap is made with #3 plastics, poly vinyl chloride and is nicknamed “toxic plastic”.  Heating that stuff up and exposing my food to it doesn’t seem like a great idea, so I put a dinner plate or a large pan lid over my bowls.  I can roast eight peppers on a cookie sheet and steam them in three stainless steel bowls.  See http://allrecipes.com/HowTo/roasting-peppers/detail.aspx for directions.
It’s a good idea to roast all sides of the peppers and steam them until they are cool to loosen the skins.
Once skinned and trimmed, I seal them in packs of two with the vacuum sealer, mark, and freeze them flat.  They are great additions to hummus, pasta dishes, and pizzas and much cheaper than the ones that can be bought in bottles.

Thursday, October 20, 2011

Cucurbit Comestibles, Part 2


So I have all these pumpkins that I bought.  As usual, I overdid it.  They did make lovely pumpkin butter, but they weren’t really cut out for pies.  Their flavor was more nutty than sweet, so I decided to go for a savory dish.
Roasted Pumpkins are the most beautiful orange on the planet.
First I roasted them.  I cut them along their lines of latitude, instead of from stem to stern.  Think Tropic of Cancer.  I scooped out their seeds and stringy innards and threw those out for the chickens (happy chickens).  Then I popped their tops back on and roasted them for an hour at 350 degrees.  My oven has this great feature: cook time.  I set it for an hour and walk away.  After the hour is finished, the oven turns itself off.  It works great for roasting, but I wouldn’t recommend it for baking.
I perused the freezer and the garden to come up with some likely ingredients for stuffing a pumpkin and came up with this. 


Stuffed Pumpkins, Italian Style

  • 2 c. chopped tomatoes
  • 1 c. green peppers
  • 1 ½ c. chopped onions 5 Italian sausages, about 1-1 ½ pounds turkey
  • 1 ½ t. Italian seasoning
  • 1 t. salt
  • ½ t. coarse ground black pepper
  • 5 small pumpkins, “Rockefeller” pumpkins have the taste of an Acorn Squash with a smoother consistency and a sturdy shell.
  • Parmesan cheese

  1. Open the pumpkins and scoop out the seeds.
  2. Roast the pumpkins on a cookie sheet, tops on, in a 350-degree oven for 1 hour.
  3. Into a large fry pan, remove the sausage from its casings, crumble, and cook over medium heat until the meat is no longer pink.
  4. Add onions and green peppers and cook until soft.
  5. Stir in the tomatoes and seasonings and remove from the heat.
  6. Spoon the meat mixture into the pumpkins.
  7. Sprinkle with Parmesan cheese.  Place the tops on the cookie sheet to reheat the pumpkin flesh.
  8. Bake at 350 degrees for 30 minutes.
Pumpkins can be served with tops on, to impress your guests.  My kids opted to butter their tops and spoon brown sugar into them for dessert.


Wednesday, October 19, 2011

Fast and Local Pasta Sauce, Year ‘Round


In Zone 4, it looks like we have a chance at a hard frost every night this week.
That pretty much spells the end for most of my garden.  I spent the morning pulling as many ripening tomatoes as I could off the vines.  I processed the ripe ones and left the ripening ones on paper on the back porch to be processed as they ripen.
This afternoon I will pull as much basil and oregano as I can to freeze for sauce.
This is our last chance to hit the farmer’s market for some local fare to put up for winter.
Bushels of tomatoes will arrive at the market this week to be sold quickly before they can go bad.  Buy as many as you can carry and pull the basil and oregano (or buy some) to put away the ingredients for a fresh and local sauce to enjoy all winter long.
This is a modification of a Cook’s Illustrated Smooth Pasta Sauce.  It’s quick and easy and can be used on pasta or pizzas.  Fresh herbs like basil and oregano seal and freeze well.  Added to recipes, they taste just like they just came from the garden.
I freeze mine in recipe ready packets, making this an even easier sauce.

Fast and Fresh Local Tomato Sauce

  • 3 pints of tomato puree
  • ¼ c. fresh chopped basil
  • 2 T. fresh chopped oregano
  • ¼ c. olive oil
  • 3 cloves minced garlic
  • 1 T. sugar
  • 1 t. salt
  • ½ t. fresh ground pepper

  1. Heat a large pan and add oil.
  2. Add garlic to hot oil.
  3. Add tomatoes to pan (quickly, don’t let the garlic begin to brown)
  4. Add the remaining ingredients and cook on low heat for 15 to 20 minutes.
  5. Adjust salt, sugar, and pepper to taste.  Home canned tomatoes tend to be more acidic than store bought tomatoes and may need some additional adjustments to the recipe.


Tuesday, October 18, 2011

Cucurbit Comestibles


cucurbit [kjuːˈkɜːbɪt] n
any creeping flowering plant of the mainly tropical and subtropical family Cucurbitaceae, which includes the pumpkin, cucumber, squashes, and gourds
co·mes·ti·ble  (ku-mes-ti-bul) n
something that can be eaten as food

My younger son is a pumpkin fanatic and will eat anything from the pumpkin/squash family happily.  My BFF and I decided to humor him and make him as many pumpkin things we could conjure.
We went to my favorite squash and pumpkin spot and brought home a dozen of a newer variety of pie pumpkin.  The owners were hoping for a multi-purpose pumpkin (who isn’t?), one that looked good, dried well, and made tasty pies.
I was happy enough for tasty pies.  My BFF eyed the handsome stems for her own crafty adventures.  Gary showed us a really cool dried pumpkin from last season.
We took a dozen wonder pumpkins home and cooked up half of them for kicks.
Not pie material.
They could have been mistaken for an acorn squash.  Yawn.
I was ready to feed the lot to the chickens and get on to the next cucurbit comestible.  Thank goodness that my BFF is more patient.  She surfed the Internet and we made some modifications and came up with a lovely pumpkin butter recipe.
Pumpkin butter must be frozen.  It is a low acid fruit and cannot be successfully sealed in a water bath canner.  Treat it like freezer jam and store it accordingly in your favorite containers.
Pumpkin Butter
  • 14 c. pumpkin puree
  • 3 c. white sugar
  • 1 c. brown sugar
  • 2 T. cinnamon
  • 1 t. ground cloves
  • ½ t. allspice
  • ½ t. nutmeg
  • zest of one orange
  • fresh squeezed juice of half an orange
  1. Mix all the above ingredients except the orange zest and juice in a large crock pot.
  2. Cook on low for six to eight hours, stirring occasionally.
  3. When the mixture reaches the desired consistency (spreadable, not too wet), stir in the orange zest and juice.
  4. Freeze in small jars or containers.

Monday, October 17, 2011

Squash and Pumpkins Galore


I had a wonderful weekend with my BFF. A good weekend for us involves lots of food and laughter. Being Fall and all in the lovely upper Midwest, we had to soak it all in: the Fall colors, football games, and all the fruits of the harvest.
I had to take her to my favorite fall spot to buy squash. Gary knows all there is to know about squash. He’ll happily make recommendations and hand out recipes. I can’t wait to stop in each Fall to see what he has to offer. I’ll admit it. I buy squash like some women shop for shoes, the more the better. My front porch is littered with them and more occupy the flat spots on the back porch. They do double duty and serve as decorations until they go into a recipe.
Gary will tell you; squash is a super food, chock full of vitamins and nutrients and so much tastier than any dietary supplement you’ll swallow. I’m always trying to find a new way to get more of it on my dinner table.
So I took my BFF to meet Gary and he gave us a tour of his cucurbit comestibles.
I’m sure that most people buy these babies because they are beautiful. I do too. But I also like to eat them.
All of this squash is lovely to look at and perfectly edible. Different types have different textures and tastes. One can buy them virtually everywhere this time of year. If you are lucky to find a Gary, get as much information as you can regarding the variety and its attributes. If you like it, plan to grow some next year if you can.
Picture credits go to my BFF, Kellie!

Wednesday, October 12, 2011

Taking Stock


I’ve been home for two days now with two sick kids.  The youngest keeps me hopping with requests delivered in a quavering voice and I have had to break up a couple of fights over the couch.  Needless to say, I have gotten very little accomplished.
I did get a chance to arrange the canned goods and take stock.
Making a list of my canned goods for the season helps me plan for the garden year to come.  If I finish the winter with far too much of one thing and not nearly enough of the other, I can plan my gardening and canning accordingly.
For me, the key will be keeping the list in a secure spot.  I had a great garden notebook, but my youngest found it and made it her own.  I think I’ll hide my canning guide in the canning cupboard, far away from the art supplies and paper stash.
My list was both informative and a little shocking. 
I was able to count up the cans of tomato puree and chopped tomatoes and estimate how many times my family would be likely to eat recipes that call for those ingredients.  I feel pretty confident that my efforts will cover those needs.  A tour of the garden, a check on the ten-day weather forecast, and the list helped me to decide what to do with the rest of the season’s tomatoes.  It looks like I’ll be making more barbeque sauce.
On the shocking end of the spectrum was the number of jars of spaghetti sauce I’d put up for the winter.  In my effort to find a sauce that my whole family liked, I canned thirty-one jars of sauce, over twenty-one quarts!  Thank goodness I have big boys who are good eaters.  It will be interesting to see how long it takes them to go through all that sauce.
I am not sure how long home canned goods last, but I am certain they keep for more than one year.  I’m confident my grandchildren won’t be tossing my apple butter supply.
Better check your supply though!  Not difficult to go crazy with canning.

Tuesday, October 11, 2011

Pumpkin Pyramids, Squash Centerpieces

The local big box grocery store started carrying more than your standard jack-o-lantern pumpkins.  I'm guessing that they are marketing them as doorstep ornaments.
I have been buying them as I see interesting ones and using them as doorstep ornaments.  After Halloween, most of them are destined for the plate.  All but the warty one on the lower left are perfect for pie or any other recipe that calls for "one can of pumpkin".
The typical jack-o-lantern pumpkin tastes more like a squash and some squash, like the Queensland Blue and the Chersonkysa, taste more like a pie pumpkin.  The first and third from the top, are probably Cinderella type pumpkins, "Rouge vif D'Etampes", a moist and delicious variety.  The white one is probably a "Casper", not as tasty as the more deeply lobed "Lumina", but a good choice for pies or bars.
The key is not to let these cucurbits freeze or rot before you can use them.
To use them, first, roast them.
Before roasting, I check to see if the mystery cucurbit is "not a gourd".
A gourd doesn't taste good.  It also doesn't smell good.  If I open a mystery cucurbit and it smells bitter, it probably won't get better with roasting, so I take a pass.  If I open a mystery cucurbit and it smells like a pumpkin or a squash, I go forward.
To transform a decoration into an ingredient:
  1. Cut open the squash/pumpkin and scoop out the seeds.
  2. Cut the pumpkin/squash into quarters or eighths
  3. Place the quarters/eighths on a baking sheet.
  4. Roast until pumpkin/squash flesh is tender.
  5. Remove flesh from the skin.
  6. Puree the flesh in a food processor.
  7. Vacuum seal, label, and freeze.
After a couple of years of drooling over seed catalogs, I recognize pumpkin/squash varieties and buy them cheaply at the big box store.  They make great decorations and even better breads, pies, and bars.  Keep an eye open for them.

Monday, October 10, 2011

It's Not Too Late to Plant Garlic

Today I ordered garlic seed for my garden.
I was reminded to do so but the horrid garlic I found in the pantry.  My dad bought it at the grocery last weekend.  It looked just fine, but it was dried, shriveled, and disgusting.  Compared to the beautiful stuff I have been buying at the Farmer's Market, that stuff was garbage, not even fit for the compost heap.
Garlic should be planted after first frost so my order wasn't late.  The only problem was finding a company that still had garlic seed in stock.  I wanted to get some from Hood River Garlic in Oregon.  Their website is so informative that I wanted to send them some business.  Unfortunately, their stock is pretty limited this late in the game.  I did find the varieties I was interested in on a site called Turtle Creek Trading Company.  I bought "Susanville" and "Chesnok" for my dad's garden and my own plot.
Over the weekend I pulled out the rest of the "Royal Burgundy Bush Beans" to dry them for seeds.  This late in the season I can't expect to harvest many more beans so I decided to prep the bed for garlic.  I left the bean plants minus the bean pods in the garden to decompose into the soil.  Today I mowed up some more leaves and grass clippings and piled them on top of the bean plants.  Then I topped the bed off with four buckets of compost from the compost pile.  I'll let the bugs and microbes work their way into leaves and grass and stuff and add a bit of water later.  There were so many nice worms in the compost.  They should have my soil beautifully amended by the time my garlic seed order arrives.
Locally grown garlic is so much better than the stuff that can be bought at the grocery store.  If you can plant some in your own garden, do give it a try.  If not, get some at the local farmer's market.  Remember that soft neck varieties store longer than hard neck varieties.
For more information on garlic cultivation, check out Hood River Garlic's informative site at http://www.hoodrivergarlic.com/.  They offer many varieties, but currently stock is limited.  I found more varieties at http://www.turtlecreektradingco.com/.  I'm looking forward to its arrival.

Saturday, October 8, 2011

Sharing Raspberries


Raspberries have so many wonderful attributes.  One of my favorite things about raspberries is their prolific nature.  They send out runners and get into all parts of the garden.  This may annoy some, but I see it as an opportunity to share one of the most productive members of my garden.
This time my raspberries have sent their runners into the tomato patch.  Those tomatoes have pretty much fallen to blight, so I have been removing the plants as the fruit ripens.  I should be ready to dig up those raspberry canes and take them to their new home.
I am sharing these canes with a new friend who just bought a new house.  The lawn along the street is challenging to mow, so she thought it would be a nice to place to grow raspberries.  Planted there, neighborhood kids on their way to the park could eat their fill and she could get out of mowing a difficult bank.
In preparation for my delivery of raspberry canes, she should:
Call the local water and gas companies to be sure that there are no buried cables or lines in the area.
Remove the sod from the area, if possible.
Rototill the area to loosen the soil.  I am not usually a huge fan of rototilling, but it’s a quick and dirty way to prepare a bed.  Raspberries are not too picky and could probably grow in gravel.  If a rototiller is not available, the area could be hand turned with a spade.
Cover the bed with landscape fabric and secure it with landscape staples.
Using a utility knife (not the husband’s fillet knife), cut Xs in the fabric where the raspberry canes will be planted.  For ease of picking, the bed should not be more than six feet deep.
Plant the canes and water them in thoroughly.
Cover the landscape cloth with woodchips or mulch of some sort.
Water the area again and daily for the next two weeks, then weekly until the end of the season.
Raspberries will send their shoots everywhere, but with the street on one side of the bed and lawn on all others, they should be relatively contained.  The new shoots can be run over by the lawn mower and kept at bay.  The landscape cloth should keep out most grass and weeds but it isn’t strong enough to keep the raspberry canes from filling in the bed.
This plan should keep my friend off that bank and the whole neighborhood in really nice raspberries.
If you are hoping for raspberries of your own, look around.  Many yards have berries growing in them and they are so prolific, no one minds sharing.  If you have raspberries in your yard, pass them on to a friend!

Friday, October 7, 2011

Save Some for the Sauce

Last night I tested a theory regarding herbs and it worked like a charm.
A few weeks ago, with the threat of frost in the forecast, I rushed out to pick a bunch of basil and oregano. I chopped up these herbs, measured them into vacuum seal bags, labeled them, and popped them in the freezer.
Last night I gave them a try. They were great.
Everyone’s all-time favorite recipe is Chicken Parmesan. I use the recipe from Cook’s Illustrated Best Recipes Cook Book. It calls for a smooth sauce made of minced garlic, olive oil, tomato puree, basil, oregano, salt, pepper, and sugar. The sauce cooks while the breaded cutlets are fried and the pasta cooks.
It was a real time saving pleasure to pull those bags of herbs out of the freezer, snip open the bags, and add them to the sauce. Not only did it save time but the sauce tasted so much better with the fresh herbs.
It reminds me of a Dr. Suess book that all my kids loved, called “Snow”. In the end, the main characters save snow from the Sun by putting it in the freezer. I take herbs and save them from the snow by putting them in my freezer.
Keep an eye on the forecast. When it calls for frost, remember:
Take some, save some
From the snow
Take all you can and go, go, go!
Get out the vacuum sealer and put those herbs away for winter.

Tuesday, October 4, 2011

It Isn’t Over Until It’s Over, So Enjoy It While It Lasts


Every morning I check the weather and it says the same thing for the next ten days: sunny with highs in the 70s.  The weather man hasn’t checked the calendar apparently.
I’ve been stuck inside processing tomatoes all week.  I finished up the most recent batch of spaghetti sauce and headed outdoors.
Since first frost seems far away, I tucked my broccoli starts into some former onion beds.  I don’t know if they’ll grow to their full maturity before the weather gets really cold, but they’ll do better in the garden than they would under the grow light in the basement.  I gave those starts plenty of compost and watered them in well.
I also planted a Fall and Winter lettuce mix I bought from Cook’s Garden.  They sell seasonal lettuce seed mixtures and I planted some salad greens in an easily protected spot.  Hopefully we can have salads well into Fall/Early Winter.
The nice thing about fall gardening is the low population of bugs and slugs.  I peeled away all the slug chewed chard leaves and the garden instantly looked neater.  If the broccoli really gets a good warm period to grow, the blue green broccoli and the rainbow chard should be just beautiful.
There are very few mosquitoes these days so I don’t have to coat myself in Deet to visit the zinnias.
The tomato plants are still producing and I bring in a colander full of ripe tomatoes every day to await processing on the back porch.
I pull carrots to be frozen daily and snip herbs for dinner recipes.
But it was nice to take a break from putting away food to plant some more food.  I may be pushing my luck.  I know that the expected date of first frost is right around the corner.  But I am living my life one ten day forecast at a time and I plan to get outdoors to enjoy every last stolen moment of it.

Wednesday, September 28, 2011

Grow It or Buy It?

Last weekend I visited the biggest farmer's market in the Big City.  I was in search of large quantities of roma tomatoes for more spaghetti sauce.  I quickly bought forty pounds of them for $24.  As my husband carried them back to the car, my husband asked, "Why grow them if you can buy them?"
It's a legitimate question.
There are some things that are better off bought.  Forty pounds of tomatoes is an example. 
I'll still grow romas.  I can process sauce and chopped tomatoes in small batches with the few pounds I can harvest every couple of days.  I'll grow many more "Jaune Flamme" tomatoes.  They were so tasty roasted in the oven.  I must always have a handful of little cherry tomatoes for salads and snacking.
Large bunches of cucumbers should be bought for pickling and I'll stick to slicers for my own garden.  My dad and I agree that there is no sense in either of us growing our own okra.  Both cucs and okra need more space than we are willing to give them.
I'll skip storage onions in favor of scallions until I can better grow my own onions.  I think I need to do something different with my soil.
These purple beans are a big hit.  And beans are easy to grow and process in small batches.  I don't know about peas.  It seems too hard to grow enough.  Still, I love them so.
Basically, my home garden is for food to eat immediately.  The market is for large scale productions that require lots of one thing (cucumbers, tomatoes, okra, corn, etc.)  Pick your own establishments are a better bet than trying to meet all my fruit needs outside my back door, with the exception of my brother's fabulous raspberries.  They can keep me happy all season long and I'll have enough to make jam as well.
Farmer's markets are nice.  They encourage diversification and a local food economy.  The prices are good and the food is better than anything to be found in the grocery store.  The grocery store can't support these local farmers, but I can.
Anyone with a market nearby can process their own tomatoes or make their own cucumbers.  Apartment dwellers can place a potted herb in a sunny window and enjoy their own harvest of thyme for a homemade salad dressing.
Stepping off the big box food chain is good for us in so many ways.  The spaghetti sauce I have bubbling on the stove top has no high fructose corn syrup in it.  The farmer that grew those tomatoes is able to make a living on her terms, with no pesticides or herbicides being sprayed on the crops or her family as they work together to bring their vegetables to market.  These tomatoes were grown nearby and didn't require a bunch of gas to transport them.  These tomatoes are part of a food chain, an ecology, a family history, and so many more things that I'd rather support.
I grow for fun, but I vote with my dollars for the local, small farmer and it's good for everyone.

Monday, September 26, 2011

A (Purple) Green Bean Worth Saving


Last Spring, I picked up a bean seed on a whim.  Thinking I wouldn’t have enough seeds to fill my bean beds, I picked up a packet of “Royal Burgundy Bush Bean” seeds from High Mowing Seeds at the local co-op.
The plants seemed more of a climber than a bush bean, so I had to quickly put in a trellis system and train the beans up it.  Unless I picked the beans very early, they tended to be pretty tough.  The plants were beautiful, but I wasn’t planning to try this bean variety again next year.
Then I tried freezing them.
Beans cannot be canned in a water bath canner because of their low acidity.  They must be processed in a pressure cooker.  And I wasn’t ready to go there last year.  So I chose to freeze them.
I didn’t like the beans that I had frozen last year.  They were limp and chewy.
These beans seem like they’ll hold up to freezing. Once thawed, the beans can be quickly steamed and served.
I think that these would even be nice cooked the way my mother did.  She cooked bacon and removed it from the pan, then fried diced onions in the bacon fat.  She drained off the excess bacon grease, added green beans to the onions, and crumbled the bacon into the beans.  Once the beans were warm, she salt and peppered and served them.
These beans just may stand up to the test.
And I plan to save the seeds from these interesting beans, a really easy thing to do with bean seeds.  I’ll leave them on the bush until the pods dry, them bring them in to dry further.
To freeze beans, I trim them and blanch them REALLY quickly by the handful.  Then I transfer them to a bowl of ice water until all the beans have been blanched.  I drain them and spread them on a towel to dry.  Once dry, I spread them on a cookie sheet and place it in the freezer.  Once frozen, I vacuum seal them in serving size bags.
To try some "Royal Burgundy Bush Beans" for yourself, check out High Mowing's site at http://www.highmowingseeds.com/organic-seeds-royal-burgundy-bean.html.

Sunday, September 25, 2011

Use the Full Bounty of Your Yard

The leaves are beginning to fall.  Why not put them to their full use in your yard?  They are great soil builders.
The key is that they must be mowed to put them to their best use.  Intact leaves encourage run off.  Chopped up leaves can trap water more easily.
This bothers my husband to no end.  He claims, rightly so, that the dust kicked up by mowing leaves dirties the carburetor.  Keep this in mind, if no one in the household can clean a carburetor, the mower may need to be taken to have a tune up.  It’s a reasonable price to pay for a good garden additive.
Mowed leaves can go right on the cleared beds in the fall, layered in 3 to 4 inches in the following order.

  • shredded leaves
  • grass clippings
  • garden compost (preferably from your own garden)
  • composted manure
  • oat straw

Mowed leaves can also be stored over the winter in heavy duty lawn bags, tied shut with a clip and stored in the garden in a sheltered spot.  If the bags are stored on their sides, the stored leaves should still be dry when the snow melts and the leaves can be used for mulching vegetable beds.
Stored leaves can also be used to build up the compost pile, layered in the pile in the following order:

"Brown" Material:

  • mowed fall leaves
  • straw
  • corn, sunflower, and amaranth stalks, cut up into pieces

"Green" Material:

  • plant material (weeds)
  • grass clippings
  • kitchen scraps
  • coffee grounds and egg shells (both VERY good for building compost)

Soil:

  • “Starter” for compost, with all the bugs and microbes needed to begin the composting process.

Lastly, leaves make good bedding for chicken coops.
Don’t send those leaves off to the city landfill.  Feed your own soil with those leaves.

Saturday, September 24, 2011

Spaghetti Sauce, Refined

Earlier this summer, I made a spaghetti sauce from a recipe I found on Barbara Kingsolver’s “Animal, Vegetable, Miracle” website. I was finding the recipe a little contradictory to what I usually like in a pasta sauce, but I decided to go for it anyway. And I tweaked it a bit (mistake). My family wasn’t too excited by it.  They'll eat it anyway, it will taste great in lasagna.
I was disappointed. I was looking forward to an easy meal alternative for my family. My boys are playing football and they need to eat about seven meals a day. I am willing to cook only two of them.
So I looked through the “Ball Blue Book Guide to Preserving” for another recipe to try. I tweaked that one too and it worked out nicely this time.
So I went to the farmer’s market, bought a ton of tomatoes, and I’ll do it again next week. And I am going to process some of it in half pint jars so the boys can come home, cook up some pasta, and pop open a can of sauce.

Tomato and Basil Sauce with a Kick
  • About 40# of roma tomatoes, processed (I blanched them in hot water, pulverized them in the Cuisinart, and processed them through a food mill) into 35 c. of tomato sauce
  • 2 large yellow onions, diced and minced in the Cuisinart
  • 2 heads of garlic, diced and minced in the Cuisinart
  • ½ c. chopped basil
  • 3 T. canning salt
  • ¼ t. pepper
  • ½ c. sugar
  • 2 t. cinnamon (my nod to Barbara)
  • ½ t. allspice (my own favorite secret spice)
  • lemon juice
  • sterilized jars
  • 2-part lids
  1. It’s not a great idea to can cooked onions and garlic in oil, so I cooked mine, top on the pot, with a tablespoon of water until they were soft and translucent.
  2. Add tomatoes, basil, and spices.
  3. Cook, uncovered, on low until the sauce reaches the desired consistency.
  4. To ensure proper acidity, add lemon juice to sterilized jars
  • 2 T. to each quart
  • 1 T. to each pint
  • ½ T. to each half pint
Cover jars with 2-part lids and process in a water bath canner for 35 minutes.

Monday, September 19, 2011

Canning With Friends

Canning is a great thing to do with a friend.
One of my good friends is back from Europe with a box full of great recipes to share.  My kids loved her tomato sauce (recipe straight from Sicily).  I have tomatoes and basil galore.  For the first time in our 15 year friendship, we both have all our kids in school at the same time!
So we plan to spend a day this week reducing tomatoes to a Sicilian sauce to put up for winter.  We'll have the day over tomatoes to catch up with each others' lives.
My friend pointed out that there are plenty of canning set ups at the garage sales.  Those who aren't as lucky could easily pick up some starting supplies at a local hardware store or online.
PLEASE NOTE:
I am having a tough time connecting to Amazon.  My intent was to show readers what the following items look like so they can be on the lookout.
Canning supplies are popping up everywhere.  Check grocery stores, big box and local hardware stores, or department stores.
I wish I could attach some pictures here, but blogger.com isn't being very cooperative.
Most effective and simple canning happens in a water bath canner. See http://www.amazon.com/Columbian-Home-0707-1-Porcelain-Water-Bath/dp/B0001UZL8A/ref=sr_1_2?s=home-garden&ie=UTF8&qid=1316444406&sr=1-2
The tools needed are cheap.  See http://www.amazon.com/Back-Basics-286-5-Piece-Canning/dp/B0002BF1WY/ref=sr_1_1?s=home-garden&ie=UTF8&qid=1316444406&sr=1-1
And the most comprehensive how-to manual is chock full of information and instructions.  See http://www.amazon.com/Jarden-Home-Brands-21400-Ball/dp/B001DIXG9A/ref=sr_1_1?s=home-garden&ie=UTF8&qid=1316399244&sr=1-1
It's a great way to spend a day with a friend, especially one new to canning.
Are you both new to canning?  It's not hard and the Blue Book Guide to Preserving is instructive and informative and OH-SO-CHEAP.
Honestly, the stuff needed to put away food is right at your fingertips.  If you see some of it at a garage sale, chances are there is more there than meets the eye, INCLUDING a former canner who may give you plenty of advice and as much gear as you can carry.
Grab a friend, grab some gear, grab some produce, and put up some food.
Then tell us how things are going!

Sunday, September 18, 2011

Applesauce, Make Your Kids Happy

My daughter is so happy, she can take homemade applesauce to school tomorrow.
My friend took me out to her parents' farm to pick apples.  We grabbed a couple of bags of apples for eating and baking.
I made a couple of apple crisps and put the nicest of the apples on the side porch to save for eating.
There were plenty of apples on the ground for sauce and all those came home with me.  There were some very small ones and most were brown and a couple were a little wormy.  No problems, I quartered them all and dropped them into a stockpot.  Those worms all floated to the top of the boiling pot, d-e-a-d.  I picked them out easily.
The brown spots of the apple crisp apples went into the stockpot of apple stuff.  The peelings went in there too.
I added a couple of quarts of water and simmered the pot for an hour an a half, until the apples softened.
I drained the apple mush and put it through the food mill.
Once I had sauced all the apples, I measured the sauce back into a stockpot.
My recipe calls for 1/4 cup of sugar for each cup of sauce.
My sauce was so naturally sweet that I used a fraction of that, about one and a half cups of sugar for fourteen cups of sauce.  I like a spiced applesauce, so I added two teaspoons of cinnamon, one teaspoon of cloves, and a half a teaspoon of allspice.  I heated the sauce and tested it.  It was perfect.
I spooned the hot sauce into pint jars and sealed them with 2-part lids and processed them in a water bath canner for 20 minutes.
It's delicious sauce, full of apple flavor, nothing like the stuff found at the grocery store.  And it's made from cast off apples, a little sugar, and some spice.

Friday, September 16, 2011

A Cool Catalog, A Couple of Problems Solved


I was really happy to receive one of my favorite catalogs in the mail today.  The Penzey’s Spices catalog not only has good spices, but it also comes with some great recipes.  I was intrigued by a couple of products.
The first was a Buttermilk Ranch Dressing mix with ingredients that I can pronounce!  That will keep the five year old happy.  Salad dressing isn’t hard to make, now it just got easier.
The second was the Italian Sausage Seasoning, again, with ingredients that I can pronounce!  I should be getting half a hog soon and I don’t want all my ground pork seasoned Italian style.  And there is a really tasty sounding lasagna recipe in this season’s catalog.
The whole catalog is online and can be found at http://www.penzeys.com/.
Besides those two interesting items, I can find all the obscure spices and herbs I need for Armenian recipes, which makes my family happy.

Thursday, September 15, 2011

Get What You Need

I have two beds that need some serious soil ammendments.  The first bed is around the cherry tree.  I didn't dig it too aggressively because I didn't want to disturb the tree.  I just planted it a couple of seasons ago.  The second bed is a new one along the side of the garage.  This one I will double dig to the best of my ability to loosen the soil.  Both need top dressing.  I have a great recipe for building soil that I got at a class I took last Fall.  It calls for 3 to 4 inches of the following, layered in this order:
  • shredded leaves
  • grass clippings
  • garden compost (keep it local)
  • composted manure
  • oat straw
I did this last year and the soil in those beds was wonderful this season.  The only problem is the fact that I don't have leaves.
I try not to take it personally that all the trees in our yard died after we bought our house.  They were all old trees.  We have plenty of new trees, but they just don't shower us with tons of leaves yet.
So I have been checking around.  Some of the maples in the neighborhood have begun to drop their leaves.  I just haven't figured out how to ask strangers if I can rake up their leaves and cart them away, dump them in my yard, cut them up with the lawn mower, and sprinkle them in my garden.
I'm set for oak leaves though!  My son has a lawn job and there are five 100+ year old oak trees in the yard.  His employer was more than happy to hear that I wanted her leaves.
I guess the key is to be bold, and ask for what I need-- LEAVES!

Wednesday, September 14, 2011

First Frost?! This Early?!?

Why should I be surprised?
After a slow start and incredibly hot stretches, why should I be surprised by anything like an early frost?  It was 90 degrees just two days ago!
So this evening, I'll be pulling out all the plastic and bedsheets that I can find to cover all that I can.  My beans are little babies.  My peppers are teeny tiny.  My tomato plants are loaded with gorgeous, GREEN tomatoes.  The cucumber vines are still pumping out fruit.  The basil is still gorgeous.
Really, we should be getting another three weeks of growing time here in Zone 4.  But, as my sister says, "You get what you get and you don't throw a fit."
But check the weather daily.  Be prepared to throw some tarps over things.  Go to the farmer's market and buy up what you can.
My peppers may never make it to red, but I can probably buy a whole crate of them for $5 in the next three weeks.  I'll roast the red ones and chop my green ones.  All will be frozen for good meals this winter.

Tuesday, September 13, 2011

Preparing Onions for Winter Storage


It’s time to bring in the onions.  Their tops have fallen over and withered away to brownness.  I doubt that I’ll even have to pull them, just pick them off the ground where they were planted.
I can tell that I am not going to have a crop of huge bulbs, not nearly enough oniony goodness to get me through the Winter.  Maybe my soil wasn’t quite right for them.  Perhaps they didn’t get enough sun.  Yesterday I resolved myself to an onion free garden.  After reading this nice site on growing onions from seed, I was having second thoughts.  Maybe I’d try them again….
Leslie Clapp wrote a very nice article for KitchenGardener magazine in 1999.  The pictures are beautiful and the directions are very concise.
Today I will pull out my onions and cure them for a couple of weeks on screens in the driveway, being sure that they stay dry, until the get a couple of layers of thick, dry skin.  Then they will be ready to be hung along the stairs to the cellar in bags for winter.  It will be interesting to see how many pounds I actually harvest.
The two types of onions that I will be sure to have in next year’s garden are scallions and Egyptian Walking Onions.  The first I planted from seed this spring and I have been enjoying fresh scallions in nearly every salad from the garden.  The second was gift from a neighbor and I happily pass them on to friends.  They produce little shallot-like onions on the top of their long, sturdy stems.  They can be harvested earlier than many other onions and taste more like a shallot.  The onion bulbs can also be spread on the ground to grow more onions the following Spring.  Bulbs can be purchased now from http://www.burpee.com/vegetables/onions/onion-egyptian-walking-onion-prod002386.html?cid=PPC.
For more information about growing onions from seed to storing them for Winter, see http://www.vegetablegardener.com/item/4076/how-to-grow-onions-from-seed.

Monday, September 12, 2011

Corn for Winter

One of the best summer tastes is fresh corn on the cob.  Now is the time to out it away for the winter.
This weekend, I struck it big.  My husband overestimated the corn serving for a party and we have it coming out our ears.
No worries,  I cut it off the cob, spread it on a cookie sheet, then pop it in the freezer.  I used to use a knife, but I bought a cool tool last summer, a Kuhn Rikon Corn Zipper which was more efficient about removing the kernels from the cobs.  Once frozen, it gets vacuum sealed in portion sized bags to go back in the freezer for meals later.  I use it in enchilladas, puddings, and chowders.  When I'm really missing summer, it makes a good side dish.
Frozen corn holds lots of moisture, so I'll defrost it in a sieve to drain some of the water from the kernels.  It's not such a big deal in enchilladas, but that extra moisture can make a corn pudding runny.
Usually, the cobs go out to the chickens.  They LOVE them.  But recently, I saw an interesting article about corn "stock".  I can't find it anymore, but the author recommended boiling cleaned cobs with a little fresh thyme in a pot of water.  The resulting "stock" will serve as a rich addition to chowders that call for a liquid.  Sounds good to me!

Friday, September 9, 2011

Tomato Puree, Any Day of the Week

Slowly, but surely, my tomatoes are beginning to ripen.
Sure, we have been eating tomatoes off the indeterminate vines for a couple of months now and we love them, but it's the roma tomatoes that I have been waiting for, not so patiently.
I begged and bought a few bags of tomatoes for pasta sauce and salsa.  I happily cut up and canned Di's guy's little round tomatoes for chili.  But this year, I'd really like to put up a good supply of tomato puree.
My family's favorite meal is chicken Parmesan and part of the draw is the sauce.  I hate buying canned sauce and last year's attempt was just too runny.  I realized I have to cook those beauties down a bit.
I tried this method this week and it was as slick as snot.  Since it's not too hot outside, I don't mind putting the heat on the big kettle of water to can a few jars of sauce.
Note: About eight roma tomatoes puree down into one pint.  Ideally, you'd like to process at least four pints of puree.  To get really nice puree, it should be cooked down to half its original volume.  I collect my ripening tomatoes and bring them in every morning.  They congregate on the screen porch table until I have at least 64, then it's time to get down to business.
No worries, this is a quick process.  You'll have plenty of time to get on with the rest of the day.

Equipment needed:
Process:
  1. Wash eight roma tomatoes and place them in boiling water.  When the skins break, transfer them to the food processor.
  2. Pulverize the tomatoes in the food processor.
  3. Transfer the tomato mash to the food mill placed over the measuring cup and process them to remove seeds and skins.
  4. Pour tomato puree into the sauce pan and tomato refuse into the compost or chicken bucket.
  5. Repeat steps 1-4 until all the tomatoes have been process.
  6. Reduce the tomato puree to half its original volume on low heat, stirring occasionally.
  7. Pour 1 T. lemon concentrate into each pint jar then ladle tomato puree into jars, leaving 1/2" headspace.
  8. Fit each pint with a sterilized 2-part lid.
  9. Process in water bath canner for 35 minutes.
  10. Cool and mark.
Repeat this process for the rest of the growing season and you'll feed your family happy food all winter long.